[ad_1]
When you buy through links on our articles, Future and its syndication partners may earn a commission.

Credit:
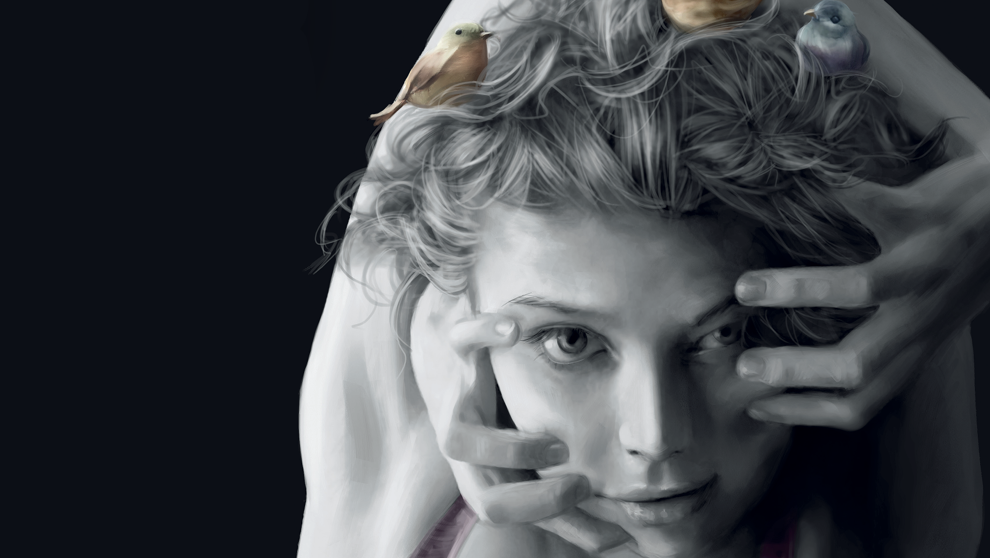
Painting greyscale images forces you to take a different approach to your digital art process and, it’s usually much harder than painting in full colour. Nevertheless, I think there are two good reasons for giving painting in black and white a go.
First, a greyscale image provides flexibility. You can treat it as a stage of the painting process, creating something that you’ll add colour to later. This is a good solution when you’re unsure about what hues to choose for the piece or are good at rendering forms but still have some doubts about your colours.
Second, painting in greyscale places the emphasis on lighting and composition rather than smaller details, so it’s great for strengthening an image’s mood, especially for dramatic or melancholic scenes. So how to approach painting in greyscale? Below, I’ll outline what I see as the key elements, starting from composition and lighting theory to texturing and final touches.
If you want to use greyscale as a basis for later adding colour, I’ll also explain how to apply hues to achieve lively effects. See our guides to the best digital art software and either the best drawing tablets or the best laptops for drawing if you need the essential tools to put all this into action. In the meantime, let’s dive in.
01. Light theory for greyscale painting

Producing a black and white composition isn’t without its pitfalls. Avoid them with the help of Marta Dahlig
In greyscale painting, light is your main tool for creating the right mood. This image shows two basic types of lighting. The first is directional – a strong, condensed light emitted from one point. Second, there’s ambient light, which is omnipresent and affects every part of the lit object with the same intensity. Then there are two types of shadow. First is the cast shadow, which is created by an object that’s blocking light. Second is the form shadow, which is created on the side of an object that’s affected by light but facing away from it.
02. Get sketching

Producing a black and white composition isn’t without its pitfalls. Avoid them with the help of Marta Dahlig
I find it handy to do a quick sketch to help me remember the direction and intensity of a chosen light. I’d recommend using highly textured, opaque brushes for marking shapes in greyscale. I’ve done this sketch in Painter 7 using a basic round brush and the Loaded Palette Knife with an opacity of between 30 and 50 per cent.
03: Make things clear in greyscale painting

Producing a black and white composition isn’t without its pitfalls. Avoid them with the help of Marta Dahlig
One problem that’s specific to painting in greyscale is differentiating between elements in an image. Colours with the same saturation and brightness levels will look identical when desaturated. So in greyscale paintings it’s crucial to vary lighter and darker elements more than you would when painting in colour.
It’s also important to make textures and surfaces distinctive. I’ll go through some texturing tricks later – for now, use naturally textured brushes as a basis for applying subsequent details. Any Oil brush from Painter or a ragged Hard Round brush from Photoshop will do the job.
04: Lighting in practice

Producing a black and white composition isn’t without its pitfalls. Avoid them with the help of Marta Dahlig
Once the sketch starts to take shape, pay close attention to where you put your shadows. Because there’s no colour to distract attention from the form’s shape, painting becomes much like sculpting – every object has to be moulded with great care to remain believable. It’s helpful to shade the shapes very generally, applying basic form shadows as you sketch.
05: Ins and outs

Producing a black and white composition isn’t without its pitfalls. Avoid them with the help of Marta Dahlig
When you’re satisfied that the basic object is ready, start thinking about detailed shadowing. To create a believable image, every element you shade has to be understood and analysed. Only once you visualise an object in three dimensions will you be able to shade it correctly.
To understand the structure of an object better, try painting a basic wireframe on top of your character to highlight the main convexities and concavities of the object’s form. In my painting’s case, the character is pressing her fingers against her cheeks and this creates a lot of extra structure to deal with.
06: Pushing the highlights

Producing a black and white composition isn’t without its pitfalls. Avoid them with the help of Marta Dahlig
You probably know the general colour-shading rule: never shade with white and black. This also applies to greyscale painting, as adding the strongest shades reduces the effectiveness of your composition, even if you use them on a low opacity.
Transition shades should be subtle, with near-white and near-black used only occasionally. The opacity of my enrichment strokes is between 10 and 25 per cent at all times.
07. How to dodge and burn in greyscale

Producing a black and white composition isn’t without its pitfalls. Avoid them with the help of Marta Dahlig
In colour painting, the use of Dodge and Burn is traditionally limited to metal and hair highlights, as well as enriching directional light effects on environmental objects. However, with greyscale there are a few more options available to you, like skin shading.
If the character’s skin is strongly affected by light, you can dodge (brighten) – with great care: just an extra highlight blob here and there.
08. Enrichment in practice

Producing a black and white composition isn’t without its pitfalls. Avoid them with the help of Marta Dahlig
Having learned about colour enrichment rules, it’s time to put them into practice. Choose some textured brushes and try to depict all of the face’s structural nuances using the wireframe you created earlier. Add darker greys all over the concave areas and lighter greys over the convexities.
Try to stick to more textured brushes. If the shading starts looking too rough, blend it in with lower opacity strokes while still using a texture brush. As a general rule, airbrushes should be avoided at this stage of the painting.
09. Basics of stylisation

Producing a black and white composition isn’t without its pitfalls. Avoid them with the help of Marta Dahlig
Once you’ve settled on your character’s basic form, it’s a good time to think about detail texturing. Greyscale looks good with a program’s more artistic setting, encouraging looser brushstrokes. And perhaps because of bolder light sources, it also boosts the overall realism of the piece, which might be a chance to implement finer detailing and texturing.
In my piece, I decide to do a bit of both and detail areas of interest – her eyes and hair – with much more care than other elements. I want to give a more painterly feel to her hands, forehead, elbow and chest to balance the piece stylistically.
10: Further stylisation

Producing a black and white composition isn’t without its pitfalls. Avoid them with the help of Marta Dahlig
A few good brushes to help you texturise and/or stylise your characters are hard round, opacity and pen-pressure controlled ones in Photoshop, or all types of inks and palette knives in Painter. The key here is to use a multitude of brushes: mix textured with smooth, hard with soft and so on.
When finalising the object, introduce some Airbrush strokes to polish any transitions. Remember, harder textures tend to stand out more, so you might want to leave your strokes bolder in the places you most want the viewer to concentrate on.
11. Finalising greyscale

Producing a black and white composition isn’t without its pitfalls. Avoid them with the help of Marta Dahlig
If you’re finishing the textures in Photoshop, keep your second view window open. It helps you to see how the textures look when zoomed out, and is especially helpful if you’re making your image photorealistic.
That said, it’s a good idea to over-texture the painting by a huge margin. Areas of focus benefit from intense brush texturing. Here I boost the level of detail in the hair significantly, which seems to work just fine.
12. Adding colour to greyscale paintings

Producing a black and white composition isn’t without its pitfalls. Avoid them with the help of Marta Dahlig
You can either leave your image greyscale or apply colour to it. If you decide to add colour, first create a new layer. Now you can set the layer’s mode to one of your choosing, or you leave the mode on Normal and use brush modes instead. This image shows the same beige colour applied on top of the greyscale with different layer modes.
13. Colour appreciation

Producing a black and white composition isn’t without its pitfalls. Avoid them with the help of Marta Dahlig
Shading human skin is tricky on a greyscale image and there’s a good chance that it’ll end up looking muddy. First, merge your grey painting for easier layer management. Because the trick to applying colour is using lots of different brush/layer modes, you might want to stick to Brush mode.
Create a colour palette: pick a midtone, a couple of midtone enrichment tones as well as a few highlight and shadow hues. Then apply the midtone using Color mode. Once you’ve done this, start applying shadows on Multiply and Color burn modes on a low opacity. Highlights work best when applied with Screen and Soft light. Finally, use variations of your midtone for colour enrichment, applying strokes in Color, Pin light and Luminosity modes.
14. Finalising colour application

Producing a black and white composition isn’t without its pitfalls. Avoid them with the help of Marta Dahlig
Of course, colouring greyscale is a matter of preference and different layer modes can be used in different ways, but there’s one last thing to remember. If you’ve created a boldly textured object in black and white, don’t use highly textured brushes when applying colour.
While a typical airbrush will be too soft and its diffused edges will make it hard to keep to the edges of the coloured objects, a Normal Round brush will be too hard. It’s therefore best to use a Hard Round brush in Photoshop with slightly softened edges. Painter’s Airbrush will also perform the job well.
15. Final touches in greyscale painting

Producing a black and white composition isn’t without its pitfalls. Avoid them with the help of Marta Dahlig
In the end, I decide to mix some colour into my greyscale painting to add emphasis and give the piece balance. After having done these last-minute colour adjustments to the piece, I balance the contrast slightly to strengthen the mood.
As a general rule, before finishing I always flip the painting to search for any hidden anatomical errors. Once that’s done, I can lay down my pen and consider the painting finished!
For more tips , see our tutorial on how to paint fabric and metal textures in digital art.
Do you have a digital art trick or hack? Share your advice in the comments below.
[ad_2]
Source link